Learning Ukulele 50 Sites Top 50 Ukulele Sites Argapa Ukuleles - one size louder: 6/1/15 - 7/1/15

Monday, June 22, 2015

A quick report before bailing out

You're not supposed to complain about your day job, I know. But sometimes I whine a bit. Today I leave for Buenos Aires to work for a week. I don't mind the travelling but I miss my wife a lot when I'm away, and my kids too. And nothing happens in the Argapa cave for a while but that's alright taking into account the speed with which I've made the second mahogany soprano during the last few weeks.

Here's a pic of ye olde number one, the raffle uke and the next soprano coming together. 

Adios!


Monday, June 15, 2015

Carving a mahogany neck

Carving necks - my favourite part of building. You can use all manners of methods for shaping necks and which tools you use to remove wood won't matter. What is important is what wood you decide to keep. That said, I use sharp hand tools. First I make two angled cuts length wise. I didn't take a pic but you can see the offcuts to the right in this pic. Then I take a small contour plane (similar to a spokeshave) and start working the edges. But really, I should have done what you see in pic #2 first. 


And that is to remove some material near the headstock so the spokeshave has an exit at the end of the cut. A sharp whittling knife is good for this but I know others use rasps. I never use rasps. 


The back of the headstock needs planing. This time I used a tool I bought on ebay where it was listed as a "luthiers plane". I suspect it's a spokeshave with the handles cut off, but since it takes a nice thin shaving I don't care what it is or was. 


More contour planing. The V-shape is established. 


And the whittling knife is again used to shape the heel. With a sharp knife I can do pretty much anything, and I never get surprised by where the knife goes. 


And here it is. I'll scrape it with concave scrapers and sand out most marks but as I have shown, sandpaper isn't really necessary. This was all done in around 25 minutes, much too fast for an enjoyable task. 


Friday, June 12, 2015

Reso number 83

Well it's not the 83rd reso, but it's a reso and number 83. A few glamour shots of the uke, I shipped it off to Simon today. 


You notice of course that the heel is a bit wider than on other Argapas, that's because the sides were a tad short. But on a reso a fatter heel doesn't matter. Thinks I. 

Tuesday, June 9, 2015

Demo of two new ukes

Will it show up? Will it move..? If it does, well then here is a rough video where I sound a bit like a bad guy in a WWII movie. I'll take a few nice pics of them in daylight for another post, but for now...

Enjöy.


Sunday, June 7, 2015

Saddle of bone

Yesterday I took a great, and as it turned out the final, leap forward. Both the reso and the all mahogany soprano are finished and strung up. 

But I did want to make a post about making the saddle for the acoustic soprano. Well the reso is acoustic too but the wooden one then. So here are the pics of that job, the glamour shots and a video demo will come in a bit. 

Once the saddle blank fits the slot I draw some lines and go at it with a wee hacksaw. Usually I make the slot to fit a specific bone blank to avoid thinning the blank. That's just tedious. A quick rub down to smoothen the surface is then enough. 


The saddle slot is angled on a true Argapa, so the top of the saddle is angled too. The top is parallel to the soundboard so all strings have the same height even if the compensation will leave  the C-string slightly longer than the rest. 

But looking at it now, the pic doesn't show the angle that well. 


And since this is an honest warts and all blog, I won't keep the next pic from the public eye and mind. The bastard blank sort of blew up!


A new blank was called in and cut to length and height. (And sanded to fit the slot that was perfect for the now broken blank but too tight for the new one.)


Height is checked, adjusted and checked again. A few times. Then the positions for the outer strings are marked. 


I use Ken Timms' divider to set the location for the holes, and the swoop of the compensated saddle. When I drill the holes I angle them toward the soundhole. 


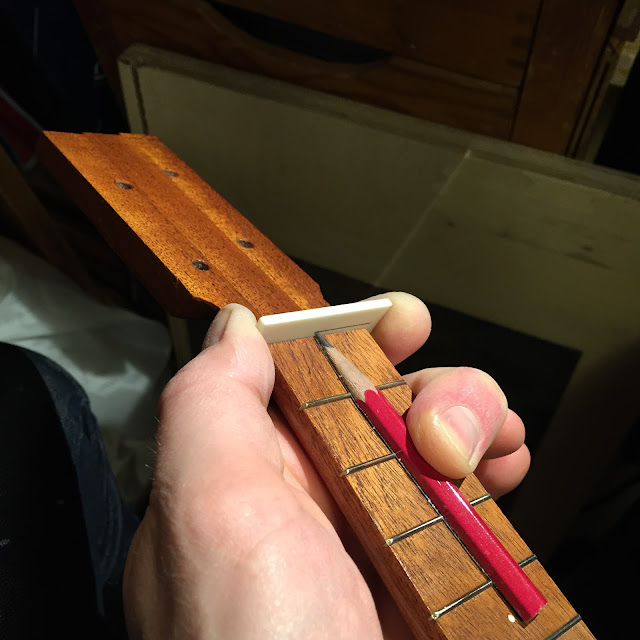
And I made the nut too, check out the half pencil used for getting the approximate height of the string slots. 


And the finished nut. I leave a bit more material at the top than you usually see on guitar nuts since it's quite easy to pop a string out when you play Devil music with lots of bends.